
| What you'll need: -A pumpkin (duh) shaped like the design that you desire to carve into it. -A pumpkin carving kit; (should include->A little saw, a poker, a scoop & sometimes a candle holder) You can get one of these made by several different manufacturers in almost any $1 stores, convienence stores, gardening shops, party supply stores & super markets. -Linolium tool with various shaped blades -Large spoon &/or pumpkin scoop (comes with carving kit) -Pumpkin preservative (You can get these at garden shops convienience stores or online. Search for 'Pumpkin Protector') -Penny-nail &/or poker (comes with carving kit) -Candle or chemical breaklight (glowstick) or a little white lightbulb. -Toothpicks -A carving pattern, scotch tape &/or Sharpie marker -X-Acto knife VERY SHARP!! -Vasoline or thick hairspray |
|
|
YOU ARE USING SHARP AND CUTTING
TOOLS. EVEN IF YOUR KIT IS A 'KID-SAFE' ONE, YOU STILL HAVE TO USE CAUTION!!!
|
|
| First, you must choose your gourd. The good old orange pumkin has always been the choice of 90% of the masses. However, don't feel that you need to conform to this standard. Odds are that you'll find all those spherical babies all bought out by the time you hit the store or farmstand anyway. When you buy your pumpkin kee in mind the pattern that you want to gouge into it. Bring your pattern along with you and see how it looks on some of the pumpkins available. | |
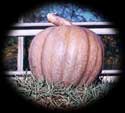 |
Find the one that fits the shape of the pumpkin the best. Also, why stop at just carving a stereotypical orange pumpkin? There's a wide variety of pumpkin species out their for you to have fun with. There are yellow, grey, green, beige, white and blue..yes blue ones out there to choose from. |
| And why stop at pumpkins? You can carve any produce you want, as long as it can structurally hold up to the carving that is. I've carved turnips, bell peppers, jalapenos, Korean radishes, apples, oranges and other various veggies and fruits. The only limit is your imagination! | |
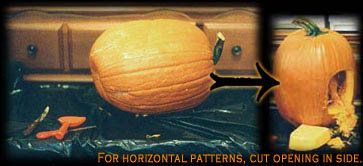
| Choose where you want to make your opening. For most people they cut a lid in the top of the pumpkin like a cookie jar. Other people like to cut the opening in the bottom. The advantage of cutting the bottom out is that it makes it easier to light the candle without burning your hands. | |
| You can just set the pumpkin over your lightsource, plus you don't have to worry about your lid dropping inside your Jack O'Lantern. You may also want to consider the shape of your pattern when cutting your opening. If you're carving an elongated pumpkin, consider cutting through the side. This part of the pumpkin will face down over your light source and will not be seen. |
 |
| Once you've cut your access inside, you need to remove all the seeds (set aside seeds for later) & strings. Scrape away the inner shell meat to about one inch of thickness. You're doing this so that your Jack O'Lantern's skin will glow like red hot iron when illumanated. | |
| Take your pattern and lay it on the side of the pumpkin that you want it to be on. I reccomend you try to carve on the side with the shalowest ridges. Crease and fold your pattern with your palm so that it conforms to the shape of the gourd. You can also wet the paper a little so that it curves. Fasten the paper to the pumpkin with the tape. Take your poker or penny-nail & poke along the lines of your pattern as if you were making a 'connect-the-dots' picture. With your whole pattern dotted in, remove the pattern paper & you should have a dot-version of your pattern on your pumpkin. You can rub some flour on the skin of the pumpkin to make the dots stand out. | |
| Now it's time to really carve this gourd! Start with the center of your design and work your way out from there. If you start out the other way you can find yourself with a weakened shell & your whole Jack O'Lantern can collapse. For the protions of your pattern that are windows though the shell, use the pumpkin saw. You don't have to cut all the way through y'know. I like to cut about a 1/3 to 1/2 way through the skin to let light glow through. By doing this you can shade tones and textures in your pattern (a sure way to make your Jack O'Lantern stand out!). Take a look at the Jack O'Lantern Section of my photography page to see examples of what I'm talking about. Remember, the deeper you cut, the brighter the light will be comming through it. | |
For nice thin lines use the linoleum knife. Press gently when you use it or you will tear the skin and get a jagged appearance. |
|
| The last thing you need to cut is a chimney through the top of the Jack O'Lantern tolet the heat of the candle or lightbulb out. Otherwise you'll cook your Jack O'Lantern from the inside & it will rot faster! Just make sure that the chimney, which is just a hole you cut though the lid, is lined up exactally with the number of candles you have inside. | |
You've got your pumpkin carved. Cool. Now it's gonna start to necrotize...y'know, rot. So you're going to want to preserve it a little while longer, especially if you just carved it and noticed that you're a few days early for Samhain! The vasoline on the edges helps slow down the dehydration but that only goes so far. |
|
| You can wrap up your Jack O'Lantern in plastic wrap & put it in the fridge. That will extend it's life a little while longer. However, if your Jack O'Lantern is a wee bit too big to get inbetween last nights left-overs & the milk you're going to need a preservative. Pumpkin preservatives are generally a fungicide | |
|
(THAT MEANS WASH YOU HANDS
AFTER USING IT)
|
|
| that retards fungus from growing in your Jack O'Lantern & turning it into a mass of goo. Pumpkin Masters, a company that has been in the Jack O'Lantern buisness for a long time now, make a spray on protector. There is another type of protector out there to. | |
 |
It's a box of fungicidal powder that you dilute in a vat of water. You place your Jack O'Lantern inside with a rock on it, because Jack O'Lanterns float, & leave it in overnight. Int he morning you'll have a protected pumpkin that will last for a month! I belive Pumpkin Masters is also the maker of this preservative to. |
Last but not least, you need to smear a thin coating of vasoline onto the cut portions of the Jack O'Lantern so as to stop precious moisture from evaporating from it. If this sounds too gross to you (after gutting the Jack O'Lantern in the first steps you must be immune to gross-outs by now) you can just spray the entire pumpkin with hairspray. This will seal it well enough for a week. A dehydrating pumpkin can be saved by placing it in water for a little while (Just don't leave it in too long or it will split up the sides!). |
|
| Let's light this candle! If you cut your lid in the top, use a lighter-wand to light the candle. If you have your opening in the bottom, you can just set the candle down in a holder and put the Jack O'Lantern over it. You can also have a one-bulb holder replace the candle and plug your Jack O'Lantern in. This is good due to the fact that it lets so much more light glow though the shell of your little demon, the glowing iron effect again. I prefer the candle though because the flicker is so much more woodland-creepy. | |
| And now... The neat stuff! Take some nutmeg & cinnamon & rub it into the inner top of your Jack O'Lantern. When the light is turned on or the candle lit, the heat will bake the spices & fill your home or portch with the smell of pumpkin pie! HAPPY CARVING!!! |
|


